

 welcome news gate-level rtlib cosimulation browser waveforms scripting documentation download webstart gallery links about
Applets
contents visual index usage FAQ feedback license
This page describes the basic usage of the Hades simulator applet.
System requirements and browser setup:
General information and user-interface:
- user-interface overview
- using the popup-menu
- bindkeys
- contolling the simulation
- logic model and glow-mode colors
- interactive switches
- editing and parameters
Additional and further documentation:
System requirements and setup
Java JDK/JRE 1.4.2 or higher
To run the Hades applets, you will need a Java-enabled HTML-browser with support for at least Java version 1.4.0. All such browsers can be used to view the applet pages; this includes Internet Explorer, Firefox, Mozilla, Opera, Safari, Konqueror, etc. The applets were developed with and have been tested using JDK/JRE (Java development kit or Java runtime environment) version 1.4.2 on Windows and Linux machines, but should also run on newer Java virtual machines (namely Java 5.0) and different operating systems including Mac OS X. Please make sure to enable Java support in your browser's preferences before trying to run the applets. You should also enable the Java console if your browser provides a separate setting for this, because some status and error messages are directed to the console.
Java webstart
You can also run the simulation framework as a standalone application via the webstart (.jnlp) links from the table-of-contents page and all applet pages. Once you click on one of the webstart links, the Java webstart installer should automatically download and check the Hades software and ask you again before running the simulator. If your browser just displays the .jnlp files as an XML-document, you might have to (re-)install a suitable version of Java or change your browser settings - please consult your browser documentation. If your browser queries you about how to handle .jnlp files, you might try to select the javaws (.exe) program from your Java virtual machine installation, e.g. $JDKDIR/jre/javaws/javaws. Note that saving a .jnlp file locally is useless, because the file contains hardcoded references to our webserver.Memory limit
Unfortunately, the default installation of the Java-plugin sets an upper limit of 64 MBytes of memory size for all applets running in your browser. This limit is no problem for most of the smaller demonstrations, but is way too small for some of the larger circuits. The default applet caching mechanism implies that parts of the total memory are reserved for recently visited applets, which reduces the amount of memory for the current active applet. Also, there seems to be an (as yet undiscovered) memory-leak, which means that about 0.5 MBytes of memory are lost each time an applet is opened. If you step through the list of all applets, the limit of 64 MBytes is quickly reached.If the Java plugin runs out of memory, the applets will react very slowly to user input, and the simulation might show bugs due to internal out-of-memory errors. In this case, you will have to exit and restart your browser, because there is currently no way to re-initialize the Java plugin or to increase the amount of memory at runtime.
Therefore, it is recommended to specify a larger amount of memory
before running the applets.
Open the Java plugin control panel and select a larger maximum
amount of memory via the user-interface or runtime switches.
For example, add the -Xmx256M runtime flag to specify
an upper limit of 256 MBytes (instead of 64 MBytes).
You may have to restart your browser after changing the Java plugin
runtime parameters.
The details depend on your operating system and Java version;
please check your system documentation or ask your local Java guru for help.
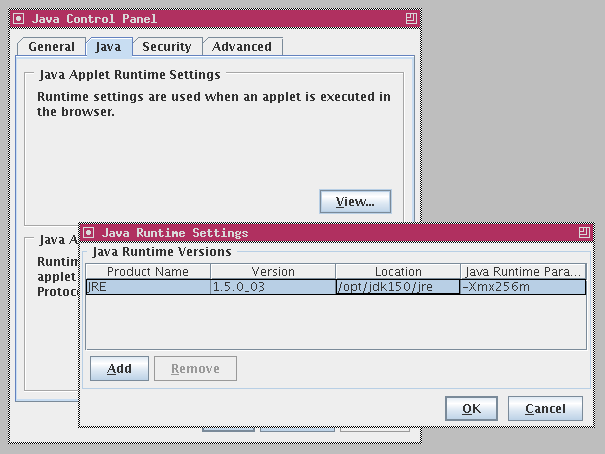
In the original JDK/JRE from Sun Microsystems, the Java plugin control panel
application is located at $JDKDIR/jre/bin/ControlPanel(.exe).
The image below shows a screenshot of the control panel with the
-Xmx extra runtime argument on a Linux system.
On Windows, you can start the Java plugin control panel either
directly from the Java runtime environment installation directory,
or via the Windows software configuration utility
(start-menu/settings/software, scroll down to locate the
Java plugin entry.)
Download time and problems
A big advantage of using Java applets is that the user does not need to keep track on how to install and update the applet software. You only need a web-browser with installed Java virtual machine, and the applet software will be downloaded and started automatically.The downside, however, is that you also need some patience, because downloading the software will take a while, especially on slow (analog modem) dialup lines. Once loaded, the applet software files will be cached by your browser, so that re-opening the web-page with the applet or opening another web-page that uses the same applet code will be much faster. For the Hades applet demos, loading the first applet will be quite slow, but opening another webpage should take a few seconds at most.
Unfortunately, the security mechanisms of Java enforce that your browser will not start a Java applet until it has downloaded the complete applet software. If the applet is digitally signed, the browser will also check those signatures before trying to run the applet code.
If the webmaster chooses to use the standard Hades software archive
(called hades.jar),
only a single file needs to be downloaded by your browser.
At the moment, the hades.jar archive file takes about 5 MBytes,
which amounts to download times of a few seconds on a fast intranet,
about a minute via a DSL (1024 kbps) modem,
but can take twenty minutes via a standard analog modem (40 kbps) line.
To reduce the download and startup times, the webmaster might also
decide to partition the Hades software archives.
This makes sense, because most applets reference and use only a small
subset of all simulation models contained in the complete
hades.jar software archive file.
However, the setup and maintainance of this type of installation is
pretty difficult, as every interdependence between applets has to be checked.
For this setup, the gate-level circuits applets require only the basic
software archive, hades-applet.jar of about 2 MBytes.
This implies a download time of about two seconds on T1 lines,
a few seconds on DSL, and still about 8 minutes on an analog modem line.
Also, note that you may expericence another startup delay
as soon as you access an applet that requires to download one of the
extra partial software archive files,
like hades-models-rtlib.jar (about 400 KBytes)
or hades-models-imaging.jar (about 180 KBytes).
At the moment, we are not quite sure whether the monolithic-big-applet-archive approach or the multiple-smaller-applet-archives approach is better. The former incurs a possibly very long startup time at the first download, but no additional download times are required afterwards; also, the single applet archive is easier to maintain. The latter means that the basic applets start faster, but additional download pauses are required when browsing through the applet collection. Please provide your feedback and ideas about this problem!
Applet configuration
Many attributes of the Hades user-interface and simulator can be controlled via entries in configuration files. This includes default values for colors, fonts, simulation control and startup, etc. The global configuration file, called hades/.hadesrc, is read together with the Java software from the the hades.jar archive file. It mainly provides useful default settings.
A webdesigner can specify a second configuration file via
the applet-parameter Hades.Applet.Hadesrc,
whose name is resolved relative to the current applet codebase.
This allows setting the attributes for individual applets without
the need to change the hades.jar archive.
After reading those global configuration files, the Hades editor attempts to read the user and local configuration files, which allows you to customize the simulator to your personal perferences. While the Hades applet will also try to read these files, the default security settings deny all file access to Java applets, which means that reading your local configuration files will fail.
Applet security and .java.policy
For obvious and good reasons, severe security restrictions apply to Java applets downloaded from the web. Unless you tell your browser and Java plug-in that an applet should be considered trustworthy, it is denied all security-relevant functions: windows created by the applet carry a warning banner ("applet window"), all file and most network operations are denied, printing is disabled, as are many other operations.
However, the security mechanism used by Java allows you to specify exactly
what operations are to be permitted for each application and applet,
based on the original codebase (webserver URL).
To allow the Hades applets to read files on your local computer,
you will have to edit the global Java security configuration file,
called .java.policy in your home directory.
Please check your Java documentation for details about creating and editing the policy file via the policytool program. Unfortunately, that program is rather user-unfriedly and difficult to use. Therefore, we offer a small utility to help you create a java.policy file with the settings required to run Hades with full functionality as an applet. Please click the following link for details about our Java Policy Editor.
Finally, it is also possible to just edit the policy file
with your favorite text editor;
just make sure not to introduce any syntax errors.
The following .java.policy
file provides an example of the settings required.
It allows the Hades applet to read the configuration files
when loaded from our webserver.
Note that you will have to restart your browser after changing your
.java.policy file for the settings to take effect.
(While our sample configuration file also includes an example (commented out) of the AllPermission setting, this should only be used during applet development or when all else fails. Visiting an unknown website with the AllPermission setting in effect is not a good idea.)
User-interface overview
The Hades applet consists of the main schematics viewer component in the center and the simulation control panel at the bottom. As the applets are meant to teach the behaviour of digital circuits via demonstrations of pre-defined examples, most editing functions are disabled and you cannot modify the structure of the circuits. However, you can control all switches and change the parameters of simulation components (e.g. gate-delays or memory contents) via the edit component function and the corresponding property sheet dialog windows. Most configuration options and edit commands can be selected either via the popup-menu or alternatively via bindkeys from the schematics viewer.Please check the applet welcome page and user-interface overview for an introduction and interactive demonstration(s) of the Hades applet. Follow the "next" links on the pages to learn about the the basic concepts of the Hades user-interface.
Fixed applet size, or external window
Due to limitations in the current versions of HTML and XHTML, the size of embedded interactive objects like Flash animations or Java applets has to be specified in the documents, usually via fixed numbers. The optional resize-function provided by Java applet does not work in most browsers. Therefore, resizing the browser window will not resize the applets.For best compatibility with the standard screen resolutions found on current LCD monitors and projectors (800x600 and 1024x768 pixels), all applet webpages contain relatively small applets at 700x500 pixels. This allows to display the navigation menu on the left together with the applet and the first few lines of circuit description on the screen. The zoom factor of the editor is then calculated so that the circuit schematics into the applet. This works well for most of the simple circuits, but may result in pretty small zoom factors for some of the more complex circuits.
If necessary, select the open in external window popup-menu item to open a new external window and to display the circuit schematics in this window. You can then resize the window to fit your screen. When you next select the open in external window function, the applet should remember the window size and position selected previously. Click the window-close button to close the external window and return to the inline applet embedded into the webpage.
Popup-Menu
Most configuration options and edit commands can be selected both via the popup-menu or bindkeys from the schematics viewer. Please visit the popup-menu page for a description and screenshot of the popup-menu.Bindkeys
While you can select most of the applet commands via the control buttons or the popup-menu, it is often much faster to type bindkeys (also called accelerator keys) to select frequently used functions.Note that the behaviour of the Hades editor depends on whether view-mode is selected or not. When view-mode is active, the editor first checks whether some input component (switch, power-on-reset, clock-generator, etc.) is registered for a keystroke. If such component is found, the keystroke is used to control the component, which is much easier and faster than moving the mouse around to click on the component. If the tooltips to be used to control simulation components are not indicated in the schematics or corresponding documentation, just enable tooltips (via the popup-menu) and rest the mouse cursor a few seconds over a component. The tooltip window indicates the shortcut key for that component.
Often, the 'c' and 'r' keys will be used
for clock and reset signals,
while '0', '1', '2 ', etc.
are used as data inputs.
If no clock signal is required,
'a', 'b', 'c', etc.
will also be used as data inputs.
For standard input components (Ipin), typing the bindkey will toggle
the output between the values StdLogic1164.0 (low) and StdLogic1164.1 (high),
while typing shift+bindkey will toggle the output value between
0 (low), 1 (high), Z (tri-state), and X (undefined).
If view-mode is deselected, the editor will bind many simple keystrokes
to edit commands, e.g. 'm' for move component
or 'c' for copy component etc.
Please check the Hades tutorial and Hades help menu for documentation
about the complete set of editor bindkeys.
In both view-mode and edit-mode, the Hades editor and applet also accept several of the common keyboard shortcuts, when used together with the control-key as a modifier.
control-Oopen design filecontrol-Nstart new designcontrol-Qquit editor, close external applet windowcontrol-Pprint (may be disabled for applets)control-Ccopy to clipboard (still disabled)control-Xcut to clipboard (still disabled)control-Vpaste from clipboard (still disabled)control-Rredrawcontrol-Fzoom fitcontrol-Gtoggle glow-modecontrol-Htoggle grid-modecontrol-Jtoggle layers
Additionally, the Hades applet supports the following bindkeys, unless those keys are used to control input switches in the current schematics:
f- zoom-fitz- zoom-outZ- (shift+z) zoom-ine- edit component parameters (show property sheet for a simulation model)g- toggle glow-mode on and offp- add probe (waveform trace) to signalP- remove probe (waveform trace) from signal
Simulation control
You can use the buttons on the simulator control panel at the bottom of the applet area (or editor window) to start, pause, or stop the simulation. The following screenshot shows the layout of the control panel; from left to right:

- Use the drop-down list control on the left to select
the simulation algorithm to be used.
For most of the interactive demonstrations,
the VHDL simulation mode should be used.
- Click the info button to print a short summary of the current simulation state to the standard output. To see the output, you have to enable and open the Java console in your browser.
- Click the rewind button to stop the simulation.
- Click the pause button to interrupt the simulation; you can resume simulation by clicking the Fast-Forward button.
- Click the run (Fast-Forward) button to start a new simulation or to resume a paused simulation.
- Click the run-for-interval button to run the simulation
for the amount of time selected via the interval textfield and
time units drop-down list.
Once the selected time has elapsed, the simulator will switch
to the paused state and wait for another command.
- The traffic light control indicates the current simulator state: red for stopped, yellow for paused, and green for running.
- The time panel indicates the current internal simulation time. In the default, real-time VHDL simulation mode, the simulation time will agree with the actual runtime (if the simulation runs fast enough).
Logic model and glow-mode colors
The so-called 'glow-mode' of the Hades applets uses different colors to indicate the current logical value of the wires (signals) that connect the simulation components. During the simulation, the colors are updated whenever a logical value changes, so that you can easily watch the behaviour of your circuits.Most gate-level simulation models in Hades use a nine-valued logic model based on the industry-standard system called 'std_logic_1164'. For details, please see the logic values and glow-mode colors demonstration page. The main idea is to provide additional logic values besides the standard values '0' (low voltage) and '1' (high voltage), so that the simulation can distinguish other important situations like 'X' (unknown value) or 'Z' (tri-state, not-driven).
The actual mapping from logical value to colors depends on the signal type and the settings in your Hades configuration files. In the default configuration of the applets, the following colors are used for the five most important states:
| 0 - logical zero (low voltage, VSS) | |||
| 1 - logical one (high voltage, VDD) | |||
| Z - tri-state (signal not driven) | |||
| U - undefined (not initialized) | |||
| X - invalid or unknown (e.g. short-circuit) |
The use of the rather 'aggressive' colors cyan and magenta for the 'U' and 'X' values makes it very easy to spot problems (like unconnected or short-circuited signals) during the simulation.
Switches
The main purpose of the applets is to allow you "to play" with digital circuits. In the default simulation mode, the simulator tracks the current inputs to the circuit and calculates and visualizes the corresponding state of all gates and signals of the circuit. While some circuits are fully self-contained or driven by special stimuli generator components, most circuits include interactive switches, that allow you to change the inputs to the circuit in real-time and watch the corresponding changes in circuit state.There are several variants of interactive switches. Please check the interactive switches demos for further information:
- Ipin
click to toggle between the 0/1 values,
or use
shift+clickto toggle between 0/1/Z/X. - IpinLarge same as Ipin, but with a larger symbols (easier to see and click at small zoom-factors)
- PulseSwitch click to generate a short 0-1-0 pulse; the actual pulse duration can be selected via the property sheet.
- PowerOnReset click to toggle between the 0/1 values. Automatically generates a U-0-1 pulse suitable for (active-low) reset of settable duration at simulation startup.
- ClockGen click to disable or enable the clock signal. Timing parameters like frequency can be selected via the property sheet.
- IpinVector
provides an n-bit output value;
use
clickandshift+clickto increase or decrease the output value.
Troubleshooting
Slow startup:
Please see the download tips above for information about a possible slow startup of the applets. You will need some patience for the first download when downloading the applets over a standard analog or ISDN modem connection.
Deadlocks:
In general, the applets should work pretty well and reliably. Unfortunately, a few of the applets can be troublesome on specific combinations of Java virtual machine and browser. For example, some Linux systems with JDK 1.4.2 installed will load and run the image processing demos without problems, but the virtual machine may deadlock for unknown reasons when trying to exit the webpage with the image processing demo. In case of such problems, you will usually have to exit and restart your browser. In some rare cases, you might even have to kill the Java virtual machine via your operating system (e.g. task manager). Most of these problems seem to be fixed in JDK 1.5.0.Please provide detailed feedback (applet, operating system, browser, Java virtual machine, ...) when you experience such problems in order to help debugging.
Keyboard focus problems:
Unfortunately, keyboard input into applets does not always work as expected, due to bugs in the interaction between the Java virtual machine and the web-browser(s).A frequent problem is that the applets do not react to keyboard input at all, because the browser does not give them the so-called keyboard focus: in other works, the browser does not propagate keyboard events to the applets. For example, on my Linux system with Mozilla (1.7.7), this seems to happen when the applets are not completely visible due to a small browser window size. Naturally, due to the large number of operating-system/browser/JavaVM combinations, many different behaviours are possible. Try the following actions to restore the keyboard focus to the applet:
- Please try a mouse-click into the main applet schematics viewer, so that the applet requests the keyboard focus from the browser, then try the typing the bindkey again.
- Try to activate the popup-menu of the applet, then release the popup-menu, and type the bindkey again.
- Try to resize the browser window and click in the applet to restore the keyboard focus.
g (toggle glow-mode)
or z and shift+z (zoom-out and zoom-in)
operations.
User-interface getting slow
If the user-interface of the active applet begins to feel really slow, the Java virtual machine might have run (almost) out of memory, so that garbage-collection overhead completely dominates actual useful computation. Please quit and restart your browser.
Memory usage (out of memory errors)
As noted above, the default installation of the Java-plugin sets an upper limit of 64 MBytes of memory size for all applets running in your browser, which may be too small. If necessary, increase the memory limit as explained above. If the Java virtual machine runs out of memory, you will have to quit and then restart your browser.
Further documentation
For further documentation, please check the following pages:- Hades applet FAQ
- Hades tutorial (PDF, English)
- Hades Kurzreferenz (PDF, German)
- Hades homepage