
 |  |
 Description
The applets in this chapter demonstrate how to use Hades
for a few simple image processing tasks.
They should be fun to watch, and showcase that event-based simulation
is not limited to the modelling of digital circuits.
The basic idea is to use a class-hierarchy of simulation objects
that operate on image data.
A corresponding signal class is used to connect the image operators.
Instead of logical values, the signals carry references to image objects
as their payload.
You can instantiate any number of image filters and simply connect
them via this new signal type.
The standard simulation engine is used to keep track of image changes
and notifies the next image filters in the filter chain or filter graph.
At the moment, all classes related to the image processing demonstrations
are kept in the hades.models.imaging package.
Most of the classes in the package implement a variety of image filters,
while the ImageSignal models the signal used to connect
the filters.
The ImageSource simulation object is used to load images from a file or URL. Just click on the ImageSource symbol to open a file-dialog and select an image file (supported image formats are GIF, JPEG, PNG). Once the image is loaded, the ImageSource model creates an event on the signal connected to its output port.
Please remember that the applet security mechanism denies file access
to applets unless you explicitly allows this via settings in the
Java configuration file.
Please see the Usage file
for details about how to grant applets file access,
if you want to open and experiment with your own image files.
If the applet detects that file access is denied,
it will open a dialog window that allows you to select one of a few
demo images, including famous image processing examples like
lena and mandrill.
The ImageViewer component is used to show an image in an external window. Simply click on the ImageViewer component to open the corresponding image viewer window. A normal left-click will close the viewer window, while a right-click will change the window size to match the image size. Note that the viewer also displays the alpha, red, green, blue values of the pixel corresponding to the mouse position in its status line.
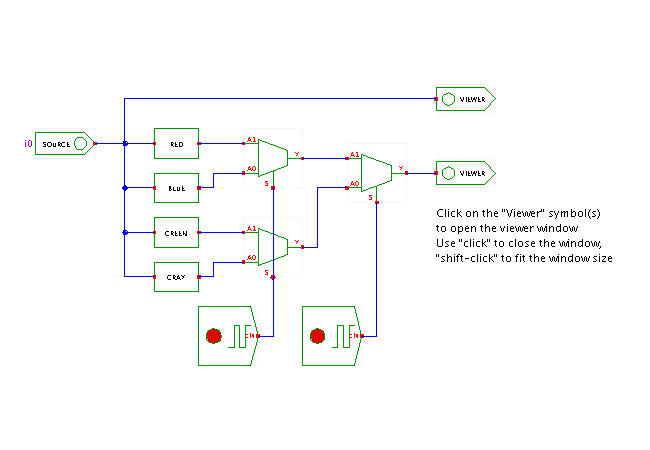
The filter graph used in this applet demonstrates the RGB (red/green/blue) color model used by most image processing algorithms. The input image is propagated to four image filters, which separate the red, green, and blue components of the input image. The gray filter uses the standard formula to convert the color input image into a grayscale image.
The output of each image filter is propagated via a cascade of image multiplexers to a single image viewer. Note that standard digital simulation models, as demonstrated by the two clock-generators, can be used together with the image filters.
Disclaimer: Naturally, the simple image filters used in this and the following applets do not provide a professional quality image-processing framework. Some of the obvious limitations are:
On the other hand, keeping the intermediate images alive means that changing a filter parameter can (and will) instantly retrigger all subsequent filters. This seems more important for the demonstrations than wasting some memory.
Tip:
The image filters from the hades.models.imaging package
can also be used standalone in Java applications or a suitable
interactive scripting environment.
The following example code shows a simple filter pipeline as a
Jython script.
Simply put the hades.jar and jython.jar archive files
into your CLASSPATH, and start the jython interpreter:
setenv CLASSPATH hades.jar:jython.jar
jython imagedemo.py
where imagedemo.py looks like the following:
from hades.models.imaging import *

i = ImageSource().loadImage( 'purple-fringing.jpg' )  # load source image
j = GrayFilter().filter( i )                          # grayscale
k = SobelXFilter().filter( j )                        # x gradient
l = SobelYFilter().filter( j )                        # y gradient
m = AddFilter().filter( k, l )                        # add gradients

c = ImageViewer()                                     # show result image
c.updateImage( i )
c.showImage()
For parametrized filters, you can use the following idiom:
from hades.models.imaging import *

# step one: initialize and configure all filters
#
pf = PurpleDetectionFilter()
pf.setP0( 30 )  # blue-red and blue-green difference threshold

cf = ConstantColorFilter()
cf.setP0( 0 )   # red
cf.setP1( 0 )   # green
cf.setP2( 50 )  # blue

mf = MultFilter()

sf = SubFilter()

# step two: load image and run filter graph
#
i = ImageSource().loadImage( 'purple-fringing.jpg' )
m = sf.filter( i, mf.filter( cf.filter(i), pf.filter(i) ))

# step three: show result image
#
e = ImageViewer()
e.updateImage( m )
e.showImage()

from javax.image import *
ImageIO.write( m, 'JPG', 'result.jpg' )
Run the applet | Run the editor (via Webstart)