TAMS / Java / Hades / applets (print version): contents | previous | nextUSART 8251 loopback receiver demonstration
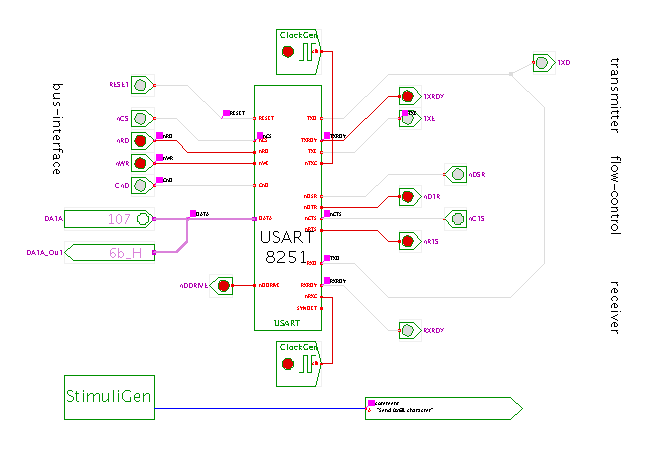 DescriptionThis applet demonstrates the receiver part of the
USART 8251 chip.
To keep the applet as simple as possible, the transmitter
of the same 8251 is used as the source for a RS-232 datastream,
and a loopback connection is made from the TXD output
of the transmitter to the RXD input of the receiver.
DescriptionThis applet demonstrates the receiver part of the
USART 8251 chip.
To keep the applet as simple as possible, the transmitter
of the same 8251 is used as the source for a RS-232 datastream,
and a loopback connection is made from the TXD output
of the transmitter to the RXD input of the receiver.
As in the previous applets, a stimuli generator component
is used to first initialize the USART and to control
the data-bus interface during the data transfers.
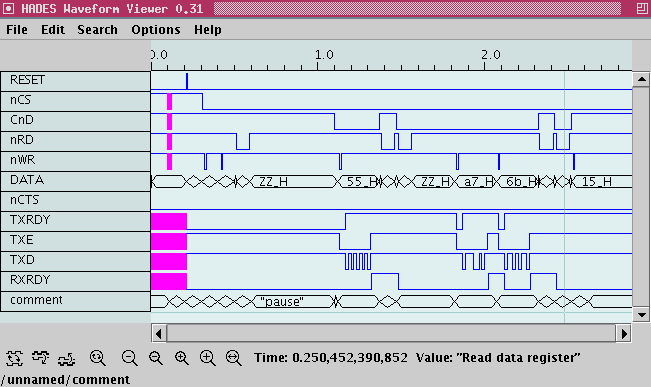
The sequence consists of the following steps:
- After a reset pulse,
a first write operation is used to initialize the 8251 mode
register with the value 0xce, which selects asynchronous
communication with eight databits, no parity, and two stopbits.
It also selects the 16X clock prescaler mode.
- Next, a value of 0x15 is written to the command register,
which enables both the on-chip transmitter and receiver,
and also resets the error indicator bits in the status register.
- A first status register read operation returns the value 0x84.
This indicates that the transmitter is ready to accept a data
character for transmission (TXRDY or D2=1, also nDSR=0 or D7=1).
The receiver has not yet received
a character, and its error flags are all cleared.
- A value of 0x55 is written to the transmit buffer register.
As the nCTS input is clear, the transmitter immediately starts
transmitting the data, which in turn reaches the receiver
via the loopback connection.
- Note that the RXRDY status output goes high as soon as
the receiver detects the first stopbit after the 0x55 data
character.
This indicates that the receiver has correctly decoded a
data character, which should now be read by the host CPU.
- Another read operation of the status register now returns
the value 0x86.
The RXRDY bit (D1) is now set, which indicates that a data
character is waiting in the receive buffer. All error bits
are cleared, indicating a successful transmission.
- A first read operation of the receive buffer returns the
data character 0x55.
Note that the read operation also automatically resets
the RXRDY output (and the RDRDY bit in the status register).
However, the data value itself is not cleared from the
receive buffer, and another receive buffer read operation
would again return the data value (0x55).
A short pause is now used, to help identifying the several
steps of operations in the waveforms.
- Next, a value of 0xA7 is written to the transmit buffer
register, the transmitter begins transmitting the character,
and the value is decoded by the receiver.
Once the receiver detects the stopbit, the RXRDY status
output is asserted again.
- We could (and should) perform another read operation now,
to access the received data value (0xA7).
Instead, we write another character 0x6B to the transmit
buffer, which is correctly transmitted and received.
Note that RXRDY goes low as soon as the startbit of the
new RS-232 transmission is detected, but goes high again
once the stopbit has been received.
- Another data read operation is performed, which returns
the value 0x6B - that is, the last received character.
The previous received character (here, 0xA7) has been
overwritten and lost.
- A status read operation now returns the value 0x96
which indicates that the transmitter is ready (D2=1)
and that a valid character has been received (D1=1).
However, the overrun error bit is also set (D4=1),
which indicates that a previously received data character
wasn't read soon enough, and has been overwritten in
the meantime.
- To reset the overrun error bit in the status register,
a command write operation with the ER bit set is now
performed.
The demonstration sequence ends here, and you should now check
the signal waveforms and identify the different steps.
The waveform viewer starts with decimal number formatting,
but it is easier to compare the values with this description
when you switch to hexadecimal number format
(menu, options, number-format, hex).
You can also click the "run" button in the simulator control
panel to continue the simulation and try to transmit and
receive more characters.
The following screenshot shows example waveforms for the above
sequence.
Note the behaviour of the RXRDY signal, and the overrun-error flag
being set in the status register afterwards.
The
next applet
demonstrates the receiver error handling,
with deliberate parity and frame errors.
Run the applet | Run the editor (via Webstart)
Impressum | 24.11.06
http://tams.informatik.uni-hamburg.de/applets/hades/webdemos/50-rtlib/65-usart8251/usart-receive_print.html